
Building a Shopify Remix App Template: A Developer's Journey
Why We Built This Template
When we started building Shopify apps at Lightspace, we noticed something interesting. Every new project began with the same setup steps, the same configuration headaches, and the same "I wish we had this ready" moments. We're not just developers; we're a blend of creatives and technology experts who believe in making things both beautiful and efficient.
Picture this: It's Monday morning, and you're starting a new Shopify app project. You know you'll need formatting, linting, testing, deployment configuration, and a dozen other things. But instead of spending the first week setting everything up, what if you could start building your actual features right away?
That's exactly what we thought, and that's why we created the Lightspace Remix App Template. We wanted to eliminate the repetitive setup work and let developers focus on what truly matters—creating value for their users.

What Makes This Template Special?
Think of this template as your Shopify app's foundation. It's like having a well-designed house where all the plumbing and electrical work is already done, but you still get to choose the paint colors and furniture. We've spent hours perfecting every detail, so you don't have to.
We've built on top of Shopify's official Remix App Template, which provides the essential foundation with Remix, Prisma, and basic Shopify integration. What we've added is a layer of developer experience improvements and best practices that make building Shopify apps even better.
Our template enhances the developer experience with:
- Tailwind CSS Integration: A modern styling solution that works seamlessly with Shopify's Polaris
- Automated Deployment: GitHub Actions workflows that handle testing, building, and deploying
- Development Tools: Pre-configured ESLint, Prettier, and other development tools
- Testing configuration: Running tests with Vitest and Playwright has never been easier
- Best Practices: Documentation and examples showing the recommended way to build Shopify apps
But what really sets this template apart is how these enhancements work together. It's not just a collection of tools—it's a carefully orchestrated symphony where each piece plays its part perfectly. When you write a new feature, everything works seamlessly.
The Developer Experience
Getting Started
# Clone the template
git clone https://github.com/Lightspace-dev/shopify-remix-app-template

# Install dependencies
npm install

# Start coding
npm run dev
That's it! You're ready to build your Shopify app. No more wrestling with configurations or setting up deployment pipelines. But let's dive deeper into what's actually happening here.
When you run these commands, a whole world of possibilities opens up. The template sets up your development environment, TypeScript checking, automatic formatting, and testing. Your code is automatically checked for best practices, and you get immediate feedback if something isn't quite right.
The Magic Behind the Scenes
1. Privacy First
"Privacy is not something that I'm merely entitled to, it's an absolute prerequisite." - Marlon Brando
Privacy isn't just a checkbox to tick—it's a fundamental part of building trustworthy apps. Shopify requires certain privacy features, and we've provided the structure you need to implement them properly.
This means you have everything you need to build privacy-compliant features while following best practices. Here's how you can implement these features:
// app/routes/webhooks.customers.data-request.tsx
export async function action({ request }: ActionArgs) {
  const { topic, shop, payload } = await authenticate.webhook(request)

  // You implement the data collection logic
  const customerData = await collectCustomerData(payload.customer.id)
  const downloadUrl = await generateSecureDownload(customerData)
  await notifyMerchant(shop, downloadUrl)
}

// app/routes/webhooks.customers.redact.tsx
export async function action({ request }: ActionArgs) {
  const { topic, shop, payload } = await authenticate.webhook(request)

  // You implement the deletion logic
  await deleteCustomerData(payload.customer.id)
}

// app/routes/webhooks.shop.redact.tsx
export async function action({ request }: ActionArgs) {
  const { topic, shop, payload } = await authenticate.webhook(request)

  // You implement the shop data deletion logic
  await deleteShopData(shop)
}
The template provides the structure and authentication, but you control how to handle the data based on your app's specific needs. This gives you the flexibility to implement privacy features in a way that makes sense for your application while ensuring you meet Shopify's requirements.
2. Deployment Made Simple
Deployment is a controlled process that gives you full control over when and how your app is deployed. We've set up a workflow that supports multiple environments and ensures your app is thoroughly tested before reaching production.
Here's how the deployment process works:
1. Manual Trigger: Deployments are triggered manually through GitHub Actions, giving you control over when to deploy
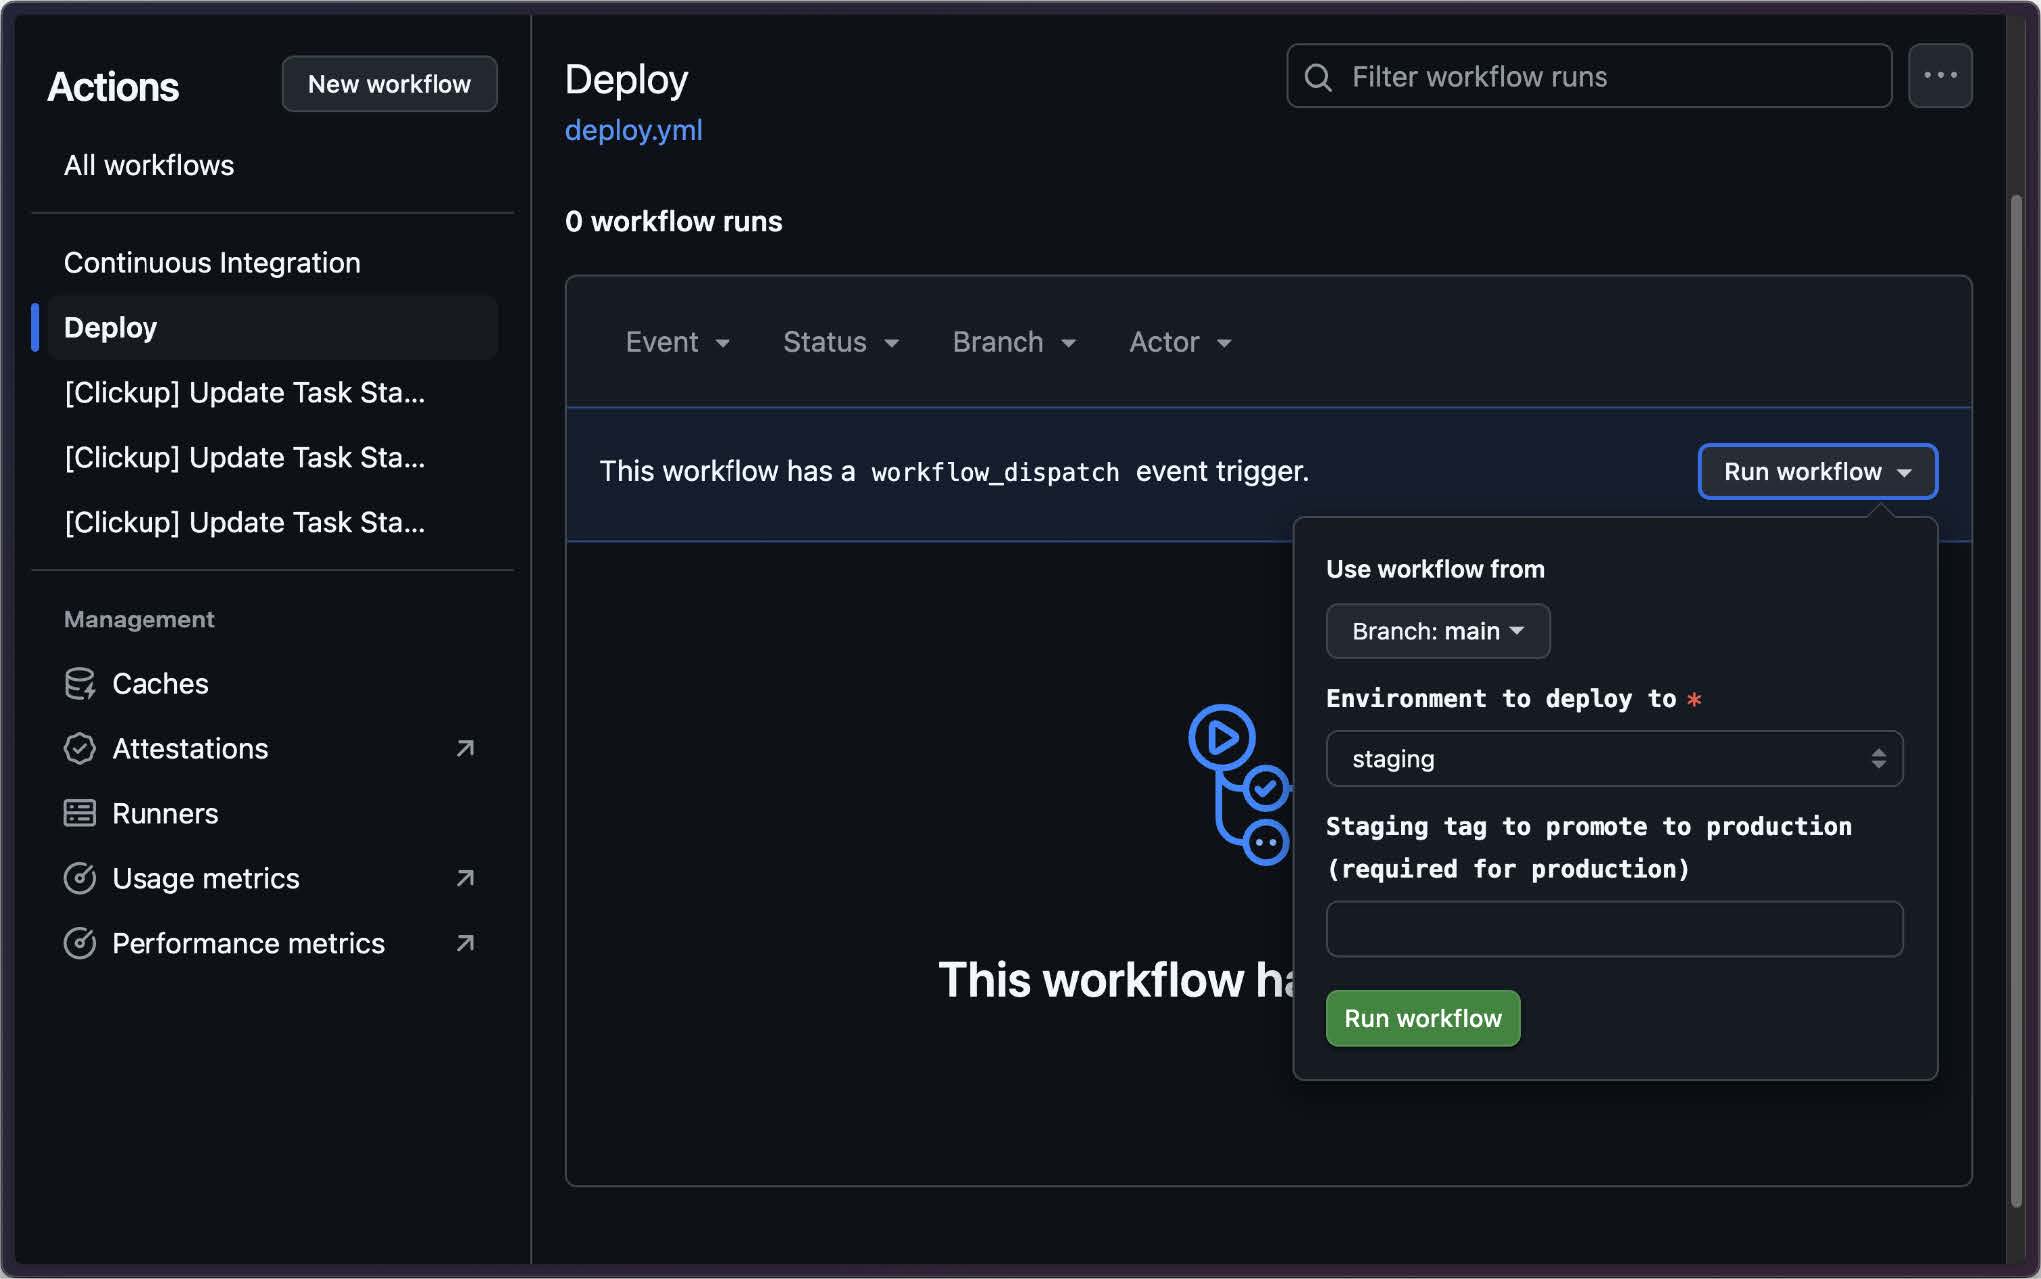
2. Staging Deployment:
- Uses semantic-release to automatically determine the next version based on your commits
- Creates a new release with changelog and version bump
- Deploys to staging environment
3. Production Promotion:
- Once staging is verified, you can promote to production
- Ensures zero-downtime deployment
- Maintains deployment history
Let's look at what happens when you trigger a deployment:
1. GitHub Actions workflow starts
2. Semantic-release analyzes your commits and determines the next version
3. A new release is generated with:
- Version bump (major, minor, or patch)
- Changelog based on commit messages
- GitHub release
4. The app is deployed to the staging environment
5. After verification, you can promote to production by selecting which specific version you want to release. This allows us to easily undo a deployment.
The best part? You have full control over the deployment process, and you can verify everything in staging before promoting to production. Plus, version management is handled automatically based on your commit messages.
Why We Chose These Tools
TypeScript: Our Safety Net
"TypeScript is JavaScript that scales." - Microsoft
We use TypeScript throughout the template to provide better type safety and developer experience. TypeScript helps us catch errors early, before they can reach your users, and makes refactoring safer. It serves as living documentation, helping other developers understand your code, and improves maintainability over time.
Here's an example of how TypeScript helps in our template:
// Without TypeScript
function updateProduct(product) {
  // What properties does product have? 🤔
  product.title = 'New Title'
  product.price = 99.99 // Is this a number or string?
}

// With TypeScript
interface Product {
  id: string
  title: string
  price: number
  description?: string
}

function updateProduct(product: Product) {
  // TypeScript knows exactly what properties are available
  product.title = 'New Title'
  product.price = 99.99 // TypeScript ensures this is a number
}
TypeScript provides us with:
- Early error detection
- Better IDE support
- Improved code maintainability
- Living documentation through types
- Safer refactoring
Tailwind CSS: Styling That Makes Sense
"Simplicity is the ultimate sophistication." - Leonardo da Vinci
We use Tailwind CSS because it transforms how we think about styling. It makes styling predictable, with a consistent set of utilities that work together seamlessly. It eliminates CSS conflicts, making it easier to maintain complex designs. It makes responsive design intuitive, with built-in breakpoints and utilities. And it keeps your bundle size small, ensuring your app loads quickly.
Here's how Tailwind makes styling easier:
// Without Tailwind
<div className="product-card">
  <h2 className="product-title">{product.title}</h2>
  <p className="product-price">${product.price}</p>
</div>

// With Tailwind
<div className="p-6 bg-white rounded-lg shadow-md">
  <h2 className="text-xl font-semibold text-gray-900">{product.title}</h2>
  <p className="mt-2 text-lg font-medium text-indigo-600">
    ${product.price}
  </p>
</div>
Development Workflow
CI/CD Pipeline
Our GitHub Actions workflow is designed to make your development process smooth and reliable. Every push to your repository triggers a series of automated checks:
- TypeScript checking
- ESLint validation
- Prettier formatting
- Unit tests
- Integration tests
- E2E tests
Here's a glimpse of our workflow configuration:
name: Continuous Integration

on:
  push:
    branches: [main]
  pull_request:
    branches: [main]

jobs:
  test:
    name: Continuous Integration
    runs-on: ubuntu-latest
    steps:
      - uses: actions/checkout@v4
      - name: Setup Node.js
        uses: actions/setup-node@v4
        with:
          node-version: 'lts/*'
          cache: 'npm'
      - name: Install dependencies
        run: npm ci
      - name: Install Playwright Browsers
        run: npx playwright install --with-deps
      - name: Run linter
        run: npm run lint
      - name: TypeScript check
        run: npm run typecheck
      - name: Run unit tests
        run: npm run test:unit
      - name: Run integration tests
        run: npm run test:integration
      - name: Run e2e tests
        run: npm run test:e2e
      - uses: actions/upload-artifact@v4
        if: ${{ !cancelled() }}
        with:
          name: playwright-report
          path: playwright-report/
          retention-days: 30
Testing Strategy
"If you don't like unit testing your product, most likely your customers won't like to test it either." - Anonymous
We've set up a comprehensive testing strategy that covers all aspects of your application:
1. UInit Testing with Vitest:
import { describe, it, expect } from 'vitest'

describe('Product Service', () => {
  it('should calculate total price correctly', () => {
    const product = {
      price: 10,
      quantity: 2,
    }
    expect(calculateTotal(product)).toBe(20)
  })
})
2. Integration Testing with Vitest UI:
import { describe, it, expect } from 'vitest'

describe('Product API', () => {
  it('should create a new product', async () => {
    const product = {
      title: 'New Product',
      price: 99.99,
    }
    const response = await fetch('/api/products', {
      method: 'POST',
      body: JSON.stringify(product),
    })
    expect(response.status).toBe(200)
  })
})
3. E2E Testing with Playwright:
import { test, expect } from '@playwright/test'

test('product creation flow', async ({ page }) => {
  await page.goto('/products/new')
  await page.fill('[name="title"]', 'New Product')
  await page.click('button[type="submit"]')
  await expect(page).toHaveURL('/products')
})
Code Quality Tools
We've configured a robust set of tools to maintain code quality:
import globals from 'globals'
import pluginJs from '@eslint/js'
import tseslint from 'typescript-eslint'
import pluginReact from 'eslint-plugin-react'
import { includeIgnoreFile } from '@eslint/compat'
import path from 'node:path'
import { fileURLToPath } from 'node:url'

const __filename = fileURLToPath(import.meta.url)
const __dirname = path.dirname(__filename)
const gitignorePath = path.resolve(__dirname, '.gitignore')

/** @type {import('eslint').Linter.Config[]} */
export default [
  { files: ['**/*.{js,mjs,cjs,ts,jsx,tsx}'] },
  { languageOptions: { globals: { ...globals.browser, ...globals.node } } },
  pluginJs.configs.recommended,
  {
    files: ['**/*.{jsx,tsx}'],
    ...pluginReact.configs.flat.recommended,
    ...pluginReact.configs.flat['jsx-runtime'],
    settings: {
      react: {
        version: 'detect',
      },
    },
  },
  ...tseslint.configs.recommended,
  includeIgnoreFile(gitignorePath),
  { ignores: ['**/generated/**'] },
]
2. Prettier setup:
{
  "printWidth": 120,
  "singleQuote": true,
  "semi": false,
  "arrowParens": "avoid",
  "trailingComma": "all",
  "plugins": ["prettier-plugin-tailwindcss"]
}
Note: Yep, we don't like semicolons at Lightspace 😉
3. Editor Integration:
- VSCode settings for consistent formatting
- Git hooks for pre-commit checks
- Automated formatting on save
NPM Scripts
We've carefully crafted a set of npm scripts to streamline your development workflow. Here's what each script does:
1. Development Scripts:
{
  "dev": "remix dev",
  "build": "remix build",
  "start": "remix-serve build",
  "typecheck": "tsc --noEmit"
}
- dev: Starts the development server with hot reloading
- build: Creates a production build
- start: Serves the production build
- typecheck: Runs TypeScript type checking without emitting files (faster than full compilation)
2. Code Quality Scripts:
{
  "lint": "eslint --cache --cache-location ./node_modules/.cache/eslint .",
  "lint:fix": "eslint --fix --cache --cache-location ./node_modules/.cache/eslint .",
  "format": "prettier --write . --ignore-path .gitignore"
}
- lint: Checks code style with ESLint (with caching for better performance)
- lint:fix: Automatically fixes ESLint issues
- format: Formats code with Prettier
3. Testing Scripts:
{
  "test": "npm run test:unit && npm run test:integration && npm run test:e2e",
  "test:unit": "vitest --run --project unit",
  "test:integration": "vitest --run --project integration",
  "test:e2e": "playwright test",
  "test:e2e:ui": "playwright test --ui"
}
- test: Runs all tests (unit, integration, and E2E)
- test:unit: Runs unit tests with Vitest
- test:integration: Runs integration tests with Vitest
- test:e2e: Runs end-to-end tests with Playwright
- test:e2e:ui: Runs E2E tests with Playwright's UI mode
4. Git Hooks:
{
  "prepare": "node .husky/install.mjs"
}
- prepare: Installs Husky git hooks when the package is installed
Husky is also configured in such a way so that the NPM installation doesn’t fail inside Docker.
Dependency Management
We've carefully managed dependencies to ensure stability and security:
- Fixed Versions: All dependencies have fixed versions to ensure consistent behavior across different environments
- Security Updates: Regular updates to patch security vulnerabilities
- Development Dependencies: Clear separation between production and development dependencies
- Peer Dependencies: Properly specified peer dependencies to avoid version conflicts
This approach helps prevent the "it works on my machine" problem and ensures your app remains secure and stable.
Commit Conventions
We use commitlint and Angular's conventional commits to maintain a clean and meaningful git history. This format is particularly powerful because it works seamlessly with semantic-release to automatically determine version bumps and generate changelogs.
1. Commit Message Format:
type(scope): description

[optional body]

[optional footer]
2. Types:
- feat: A new feature (triggers a minor version bump)
- fix: A bug fix (triggers a patch version bump)
- docs: Documentation only changes
- style: Changes that do not affect the meaning of the code (white-space, formatting, etc)
- refactor: A code change that neither fixes a bug nor adds a feature
- perf: A code change that improves performance
- test: Adding missing tests or correcting existing tests
- build: Changes that affect the build system or external dependencies
- ci: Changes to our CI configuration files and scripts
- chore: Other changes that don't modify source or test files
3. Breaking Changes: To indicate a breaking change that should trigger a major version bump, add BREAKING CHANGE: in the footer:
feat(auth): change OAuth2 implementation

- Replace Google OAuth2 with Auth0
- Update user model structure
- Remove legacy authentication methods

BREAKING CHANGE: The OAuth2 implementation has been completely replaced with Auth0.
This change requires users to re-authenticate and may affect existing integrations.
4. Version Bumping:
- feat commits trigger a minor version bump (1.0.0 → 1.1.0)
- fix commits trigger a patch version bump (1.0.0 → 1.0.1)
- Breaking changes trigger a major version bump (1.0.0 → 2.0.0)
5. Changelog Generation: semantic-release automatically generates a changelog based on your commit messages:
# Changelog

## [2.0.0] - 2024-03-20

### Breaking Changes

- OAuth2 implementation replaced with Auth0 (#123)

## [1.1.0] - 2024-03-15

### Features

- Add new product recommendation feature (#120)
- Implement user preferences (#121)

## [1.0.1] - 2024-03-10

### Bug Fixes

- Fix product price calculation (#119)
6. Example
feat(auth): add OAuth2 authentication

- Implement Google OAuth2 provider
- Add JWT token generation
- Update user model with OAuth fields

Closes #123
The Lightspace Touch
At Lightspace, we believe in more than just writing code. We believe in creating experiences that combine technical excellence with creative vision. Our template reflects this philosophy through clean, maintainable code that's a joy to work with. We focus on beautiful user experiences that delight users while being efficient and sustainable. This isn't just a template—it's a foundation for building apps that make a difference.
Getting Started
1. Clone the template
git clone https://github.com/Lightspace-dev/shopify-remix-app-template
2. Install dependencies
npm install
3. Set up your environment
cp .env.example .env
4. Start developing
npm run dev
Shopify App Configuration
The template includes three different Shopify app configuration files to support multiple environments:
1. Development Environment
(shopify.app.development.toml):
name = "my-app-dev"
client_id = "your-dev-client-id"
application_url = "https://dev.my-app.com"
embedded = true
scopes = "write_products,read_products"
Used during local development and testing. This configuration:
- Points to your development server
- Uses development API credentials
- Has minimal required scopes for testing
2. Staging Environment
(shopify.app.staging.toml):
name = "my-app-staging"
client_id = "your-staging-client-id"
application_url = "https://staging.my-app.com"
embedded = true
scopes = "write_products,read_products,write_customers"
Used for staging deployments. This configuration:
- Points to your staging server
- Uses staging API credentials
- Has expanded scopes for testing full functionality
3. Production Environment
(shopify.app.toml):

name = "my-app"

client_id = "your-production-client-id"

application_url = "https://my-app.com"

embedded = true

scopes = "write_products,read_products,write_customers,read_customers"
Used for production deployments. This configuration:
- Points to your production server
- Uses production API credentials
- Has all required scopes for full functionality
Each environment has its own:
- App name
- API credentials
- URL configuration
- Required scopes
- Webhook endpoints
This setup allows you to:
- Test changes safely in development
- Validate features in staging
- Deploy confidently to production
- Maintain separate app instances for each environment
Common Questions
"Do I need to understand all of this?"
No! The template is designed to work out of the box. You can start building your app's features right away and learn the internals as you go. We've documented everything, but you don't need to read all the documentation to get started.
"What if I need to customize something?"
Everything is modular and documented. You can:
- Modify the deployment process
- Change the styling system
- Add new features
"Is this production-ready?"
Yes! We use this template for our own Shopify apps at Lightspace.
Join the Journey
We're constantly improving this template based on:
- Developer feedback
- New Shopify features
- Industry best practices
- Our own experiences
Feel free to:
- Share your experiences
Resources
Built with ❤️ by Lightspace - Where creativity meets technology
Lightspace is a branding & development agency based in San Diego, California and Miami, Florida USA.
Copyright ©2025 | Lightspace | All Rights Reserved